
Hands-On with Black Salt Audio Telos Drums: The Ultimate Simple Drum Mixing Plugin?

Hey everybody, welcome back to HomeRecordingMadeEasy.com! Today we're diving into something a lot of you have been waiting for—a deep, hands-on look at the Telos Drums plugin from Black Salt Audio. If you’re a musician or mixing engineer who wants better drum sounds fast, or just someone interested in seeing if a new “all-in-one” solution can really stand up in a real mixing context, you’re in for a treat.
This post will walk you through everything I discovered about Telos Drums: the interface, the sound, what the different controls do, all with lots of screenshots, tips, and honest opinions along the way. I’ll even share how I use it in a DAW session from scratch.
“It takes your drums from sounding really good to sounding better. Right? And it does it without needing five plugins per track or a degree in engineering.”
Let’s get started!
Table of Contents
Introduction: What is Telos Drums?
Chances are, if you spend time mixing at home or working as a self-producing musician, you’ve probably already heard about the Telos Drums plugin from Black Salt Audio. It’s getting a lot of buzz since its launch in early 2025. Black Salt Audio sent me their entire bundle, and—even though this video isn’t paid or sponsored (just got the plugins for free)—I’m pumped to share my honest thoughts.
Simply put:
-
Telos Drums is designed as an easy, all-in-one drum channel plugin.
-
You don’t need to understand engineering, eq frequencies, ratios, or any of the “nerdy stuff.”
-
It’s made to help you get big, punchy drum sounds fast without complicated setups.
And if you caught my earlier review of their guitar plugin, you already know: they’re squarely focused on simple workflow and fast results.
Plugin Setup & Session Context
Before we dive into the actual plugin, here’s a quick runthrough of the session context:
-
DAW: Studio One
-
Tracks in Use: Kick In, Kick Out, Kick Sub, Snare Top, Snare Bottom, Overheads (L/R), Room Mics (L/R)
-
Plugins in Chain:
-
Telos Drums is the focus.
-
4K SSL Native Channel Strip (completely bypassed for this video).
-
Black Salt Audio Silencer on some kicks for gate/cleanup, but nothing else before Telos Drums.
-
-
Goal: Shape each drum mic with only Telos Drums, then blend into a full-sounding kit.
Here’s how the session looks when loading up Telos Drums:
Right off the bat, it’s refreshing to work with a totally unprocessed kit—just raw tracks, ready for some color.
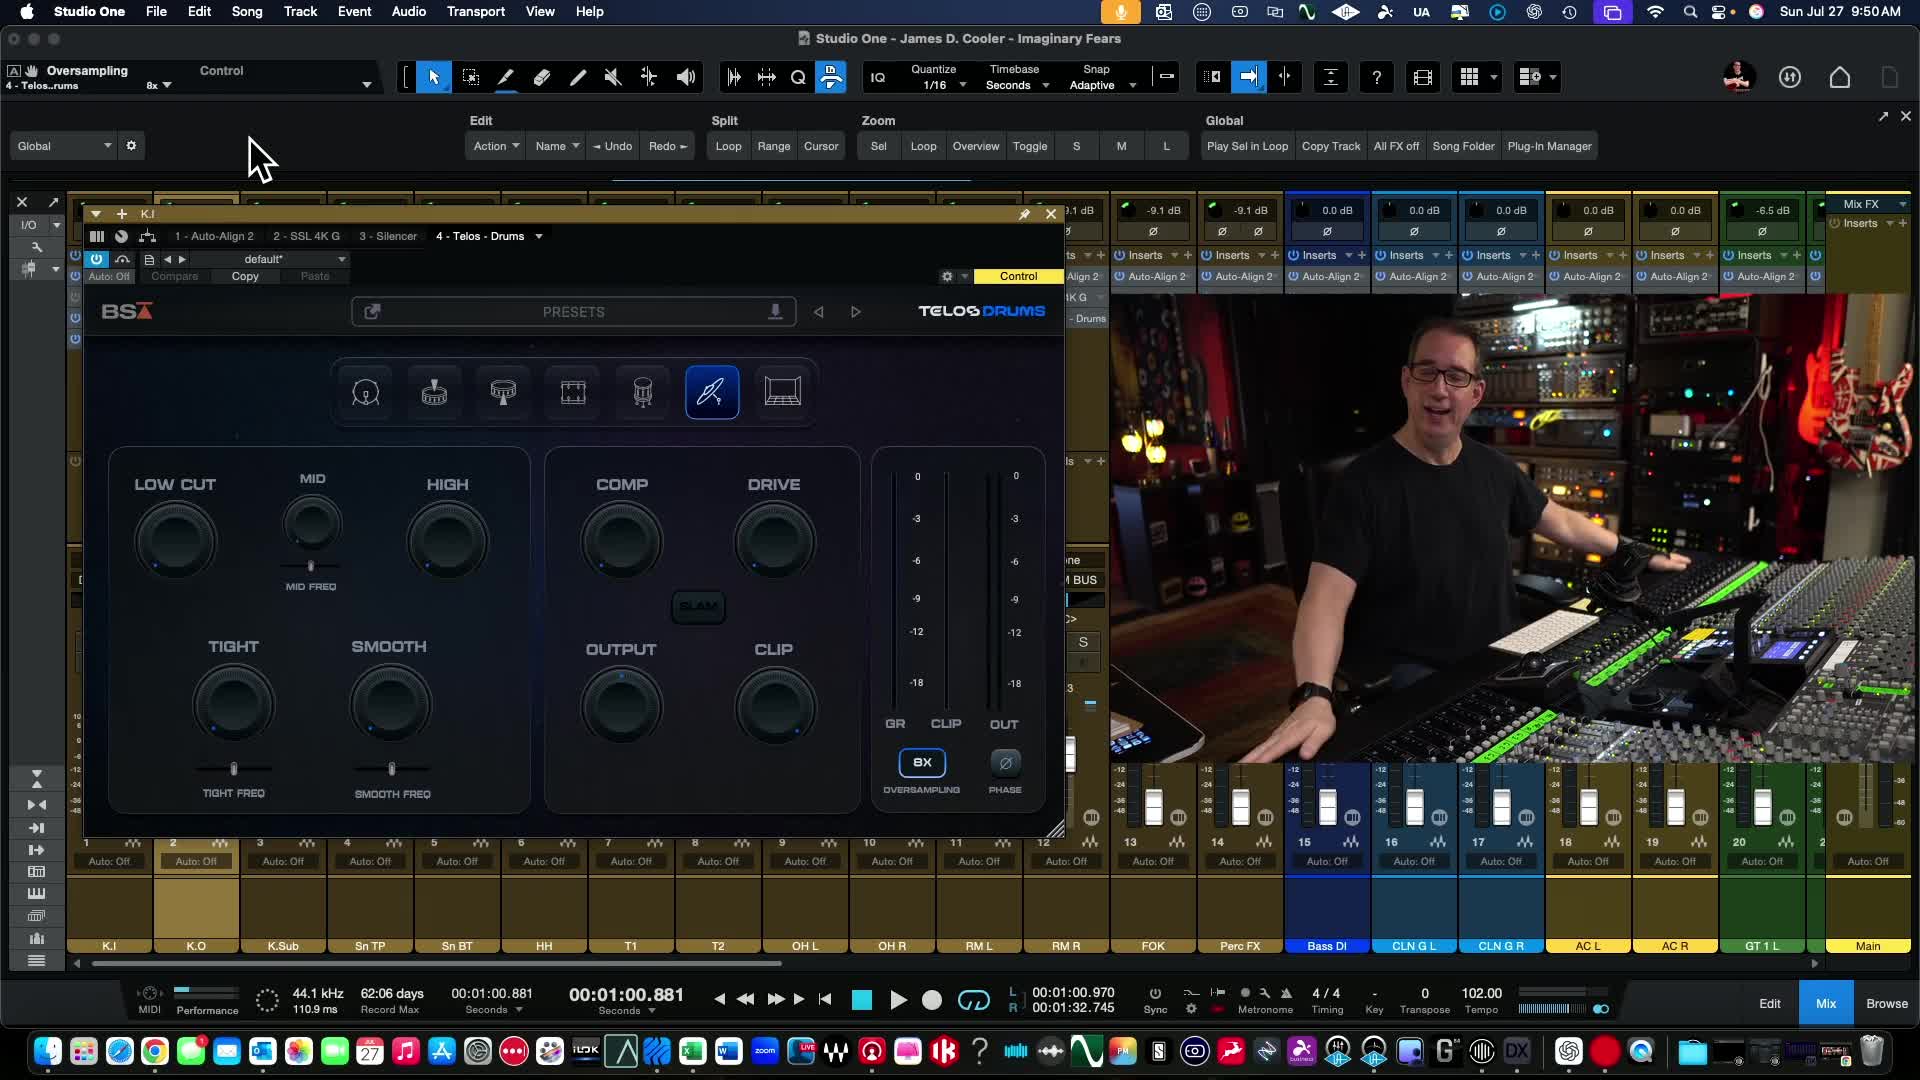
First Look: The Telos Drums Interface
If you’ve checked out the Black Salt Audio guitar plugin, you’ll feel right at home here. The interface is just as sleek and straightforward, but with drum-focused controls.
Let’s break down the main sections:
Preset Browser
-
Access: Top menu bar
-
What’s Inside?: A bunch of useful presets (sometimes all you need for a quick fix; not used in this walkthrough till the end).
Drum Type Selection
-
Switches: Kick, Snare, Overhead, Room, Cymbals, and more
-
Smart Feature: Controls adjust automatically based on the drum type, so you never need to second-guess what’s relevant.
Main Processing Controls
-
EQ Section: Low, Mid, High (plus mid-frequency selector)
-
Character Dials: Tight, Smooth (with frequency selection), these let you sculpt attack and overall tone.
-
Compressor: One knob, with a gain reduction meter (hidden gem!)
-
Drive/Saturation: For that extra punch or dirt.
-
Output and Clipping: Simple output level, clip toggle for added crunch.
-
Utility: Oversampling and Phase buttons.
“You don’t need to know anything about fundamental frequencies… just turn it up till it sounds good, turn it down till it sounds good. That’s what we’re gonna do.”
Everything’s drag-and-tweak ready. No deep menu dives or graphic EQ curves. Just intuitive, musical controls.
Working Through the Kit: Step-by-Step Walkthrough
Let’s walk through the drums one by one, building up a mix using only Telos Drums.
Pro Tip: I always recommend treating each mic individually first, then blending them to taste for the whole drum sound.
Kick Drums: In, Out, and Sub
Kick In Mic
Unprocessed, our kick in is decent, but we want more weight and definition. Here’s the process:
-
EQ Tweaks
-
Dial up some Low to add body.
-
Push High a touch for more click and attack.
-
-
Mid Frequency Play
-
Not always clear what’s being moved (doesn’t specify Hz), but broad sweeps let you “seek and destroy” problem areas or boost tone with your ears only.
-
-
Tight & Smooth
-
Tight cuts resonance, focusing on transient. Perfect for the kick in—it keeps things punchy.
-
Smooth rounds off the hardest edges, which can also be useful in heavy genres.
-
-
Compression
-
One knob. Easy. The gain reduction meter gives you a sense of what’s happening, even if you don’t love meters.
-
“You have a gain reduction meter here—I didn’t even notice that!”
-
-
Saturation/Drive
-
Push for grit if you want aggressive rock or even hip-hop kicks.
-
-
Comparison:
-
Hit bypass and it’s night and day—a better, fuller, punchier kick.
-
Kick Out Mic
-
Less “tight”; let it resonate for a fuller tone.
-
Blend with the Kick In.
-
Adjust level to avoid mud, brighten slightly with EQ if needed.
Kick Sub
-
Roll off non-subs, maybe a touch of Smooth.
-
Often felt more than heard, especially for YouTube/audio demos.
-
When blended, contributes “that thick, sub low” that makes the kit shake.
Mixing all three: with and without Telos Drums—clear, solid step-up in punch and unity.
Snare Drums: Top and Bottom
Snare Top
-
Switch plugin to “Snare Top” type—controls auto-adjust.
-
Add “snap” with High EQ, experiment with Tight for maximum crack.
-
Smooth for taming spiky attack (especially if your snare was harsh in tracking).
Snare Bottom
-
Usually wants more body and less brightness.
-
Dial in lows/mids and compress a little.
-
Blend with Snare Top for full snare picture.
Overheads: Brightening Up the Kit
Now for the stereo image! Overheads can sound dull, so...
-
Switch to Cymbals/Overhead Drum Type
-
Try a Preset: Lots to pick from—sometimes a good starting point.
-
EQ: Boost High for clarity, pull Mid if cymbals feel washy.
-
Smooth: “Almost seems like it’s a scoop”—great for tucking down fizz.
-
Pan and Blend: Left and right overheads give width.
Room Mics: The “Slam” Feature
This is where the plugin pulls ahead from “just quick EQ” territory…
-
Switch to Room Drum Type: Now things change: High turns into High-Cut, and you unlock the “Slam” control.
-
Slam: Basically a parallel compressor built in—dial up for explosive room or back for more natural space.
-
-
“It changes the high to a high cut, and now you have the slam button… Let’s check this out.”
Again, pan your left/right room mics and blend to taste.Blended with the kit, it delivers size fast.
Features in Detail
Let’s break out the core features and see why they’re so approachable.
EQ Section
-
Low, Mid, High: No frequencies labeled, just “turn it up or down.” The plugin does the work under the hood, choosing musical ranges.
-
Mid Frequency: Single dial lets you “focus” on what matters for snare ring, boxiness, etc.
Why no frequency values? Black Salt’s approach is about simplicity—you’re not meant to worry about Hz, just what sounds good.
Compression, Saturation, and Drive
-
Compressor: One knob. All attack/release/ratio decisions handled by the developer’s ears. You see how much is happening via a simple gain reduction meter.
-
Drive/Saturation: Twist for more “hair,” dirt, or extra snap depending on how far you go.
-
Output, Clipping, Phase, Oversampling: All optional, but handy for final tweaks.
“You would need compressor, EQ, saturator, maybe another EQ—three to four plugins per track to do what this thing does in one.”
Presets & Workflow
Telos Drums comes loaded with ready-to-go presets for all drum types and genres.
-
Want ‘Punched Out Snare’ fast? Just click through and audition.
-
Works for overheads, rooms, toms, you name it.
For most advanced users, the quick-tweak controls might even let you skip presets and just use your ears.
Comparing Processed & Unprocessed Drums
A/B testing processed and unprocessed tracks is crucial. Here’s what stood out:
-
Bypass all Telos Drums instances: Drums go from “OK” to “alive.” Punch, clarity, and depth are immediate.
-
With plugin engaged: Everything sits together, sounds finished—even before more complex busses or group processing.
“Here’s with it. And then I’ll bypass it. Solo up. Here we go.”
It’s the kind of difference that can take raw tracks and make them ready for a mix with almost no effort.
Final Thoughts: Is This the Drum Plugin to Beat?
Let’s break down the big pros and a few cons:
Pros
-
Simplicity: There’s nothing confusing here. No learning curve. Just grab a dial and go.
-
Speed: Dialing in great drum sounds takes seconds, not minutes.
-
Full Suite in One Plugin: EQ, compression, saturation, clipper, phase, and even a “parallel slam”—most other plugins require three or four insert slots.
-
Sound Quality: It sounds… really good! Drums come alive, and it’s easy to blend natural and aggressive tones.
Cons (For Some Users)
-
Lack of Label Detail: No frequency values may bug mixers who like to know exactly what’s being tweaked.
-
Limited for Deep Tweakers: Advanced engineers might want more under-the-hood options, but that’s not the audience.
-
All-In-One Approach: Not always flexible for extreme sounds, but covers 90% of typical needs with ease.
“I’m never a real big fan of these all-in-one plugins, but I think this one actually delivers. It just works.”
Who Is This For?
-
Home musicians who want mix-ready drums without years of mixing study.
-
Songwriters making demos—put Telos Drums on, print, move on.
-
Working engineers who need to fix problem drum sounds fast—more flexibility than presets, but still easy.
FAQ and Bonus: Free Mixing Course!
Q: Can I use Telos Drums with any DAW?
A: Yes! Works with Mac or PC, and runs as a VST/AU/AAX, so it’s compatible pretty much everywhere.
Q: Is the plugin CPU heavy?
A: Pretty light—doesn’t choke even with seven or eight instances across a kit. Oversampling is there for “pro” mode, but not always needed.
Q: Does it sound good on all drum sources?
A: From my tests—kicks, snares, rooms, overheads, even sub mics—yep. Presets provide a leg up if you’re stuck styling a certain genre.
Q: Do you need experience to use it?
A: Not at all! Total beginners can get a great sound, and seasoned mixers (like me) can appreciate the speed.
Bonus: Free Mixing Course for You
If you want to level up your skills even further, I’m giving away my 90-minute mixing course for free—no catch, no expensive plugins or gear required!
👉 Download it here at HomeRecordingMadeEasy.com
Use what you learn with Telos Drums or ANY stock plugin in your DAW.
Conclusion
To wrap it up: Telos Drums from Black Salt Audio stands out as one of the best “all-in-one” drum channel plugins I’ve tried. Its real strength is in the simplicity—you can get from raw tracks to a solid drum sound before you even blink, and it sounds competitive with setups that normally need three, four, or more plugins per mic.
Not everyone needs—or wants—the deep tweakability of legacy channel strips. Sometimes you just want a great sound now. That’s where Telos Drums shines.
Is there another plugin out there that does what this one does, as simply and musically?Frankly, not that I’ve used. If you know of one, let me know in the comments!
Try it for yourself—Black Salt Audio has a demo and loads of resources. And if you want to check out my full hands-on session or see more plugin rundowns, be sure to stick around on the blog and subscribe on YouTube.
“This is useful and cool... Just trying to think off the top of my head—is there another all-in-one drum plugin that competes with this? I don’t think so. Nothing that I’ve tried.”
Links
Coupon Code: YOUTUBE25
Like my style and want more deep-dive training? Use the coupon code YOUTUBE25 for 25% off all paid courses at HomeRecordingMadeEasy.com.
Let’s Talk!
Have you tried Telos Drums? Found another gem for instant drum mixing? Drop your insights, questions, and experiences in the comments below.
Until next time—keep making great music!
—Dave, HomeRecordingMadeEasy.com
“I just like to pass stuff along to you guys when you ask me about it and if I find something useful and cool, I like to bring it to you.”

