
Mixing Drums with the Apogee Bob Clearmountain 8068 Neve Channel Strip: A Deep Dive Series

Welcome, friends, to another mixing adventure! Whether you’re a regular at HomeRecordingMadeEasy.com or stumbled onto this from my YouTube channel, you’re in for a treat. Today we’re kicking off the first part of a brand new in-depth mixing series that’s all about channel strips and analog-style plugins. Our focus? Bringing that warm, cohesive analog studio sound right into your DAW—using just a handful of smart, great-sounding plugins.
This week, we're checking out the Apogee Bob Clearmountain 8068 Neve Channel Strip plugin. If you're a fan of that classic Neve punch and vibe (and honestly, who isn’t?), this is an episode you don't want to miss. We're going to crack open some raw drum tracks, walk through every control, and listen together as we sculpt out an incredible drum mix using just this one channel strip.
Ready to give your drums that legendary Neve glue? Let’s get started!
Table of Contents
Why Mix with Channel Strips and Analog Plugins?
Mix engineers are always searching for that magical sound—the warmth and punch of analog, the vibe of classic gear—straight out of our DAWs. Channel strips and analog-style plugins are the fastest way to get there. Throw them on every track, and you get:
-
Cohesion: Everything flows through the same "console," just like in a real studio.
-
Consistency: Every element starts with the same tonal fingerprint.
-
Speed: Fewer plugins, faster decisions, more fun mixing.
“When you throw the same channel strip plugin across your whole mix, it just glues everything together right from the start. That’s the magic of the analog workflow.”
First Impressions: The Bob Clearmountain 8068 Plugin
Before we get our hands dirty, let’s talk about today’s star: the Apogee Bob Clearmountain 8068 plugin. If you’re new to Neve or channel strip emulations, here’s what makes this one so special:
-
Based on Bob Clearmountain’s personal Neve 8068: Yes, the actual console he mixed on at the legendary Power Station studio.
-
Modeled right from hardware: Every bit of mojo, warmth, and punch.
-
Easy, no-fuss interface: No fiddling with dozens of hidden menus.
If you want to see the gear up close, Apogee actually did a neat documentary with Bob himself showing off his 8068 console. Highly recommended viewing—check out the Apogee site for more.
Getting to Know the 8068 Channel Strip
Now let’s really dive in. What does the 8068 plugin bring to the table, and how do you use it?
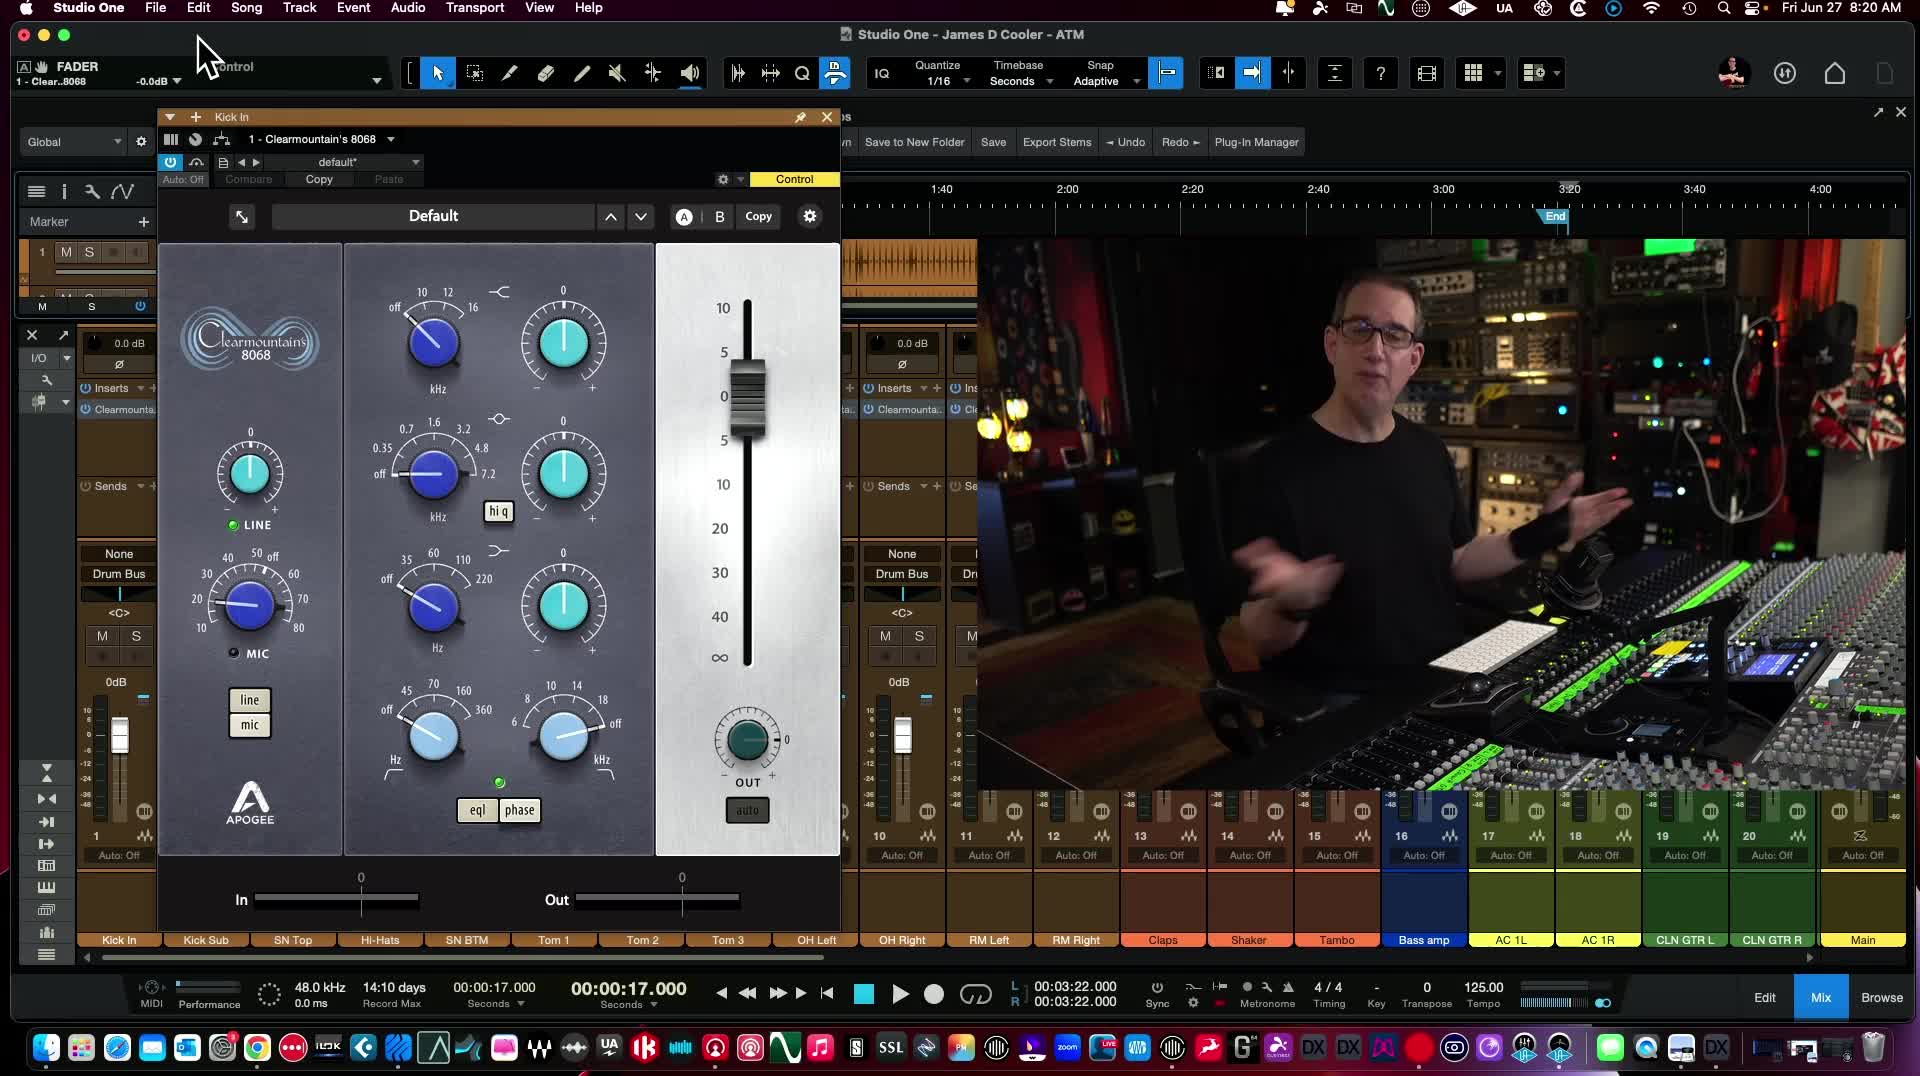
Layout and Controls
The plugin’s design keeps things simple and true to the original Neve desk. From left to right, here’s what you’ll find:
-
Line/Mic Selector: Start with a line or mic input, just like patching into the real board.
-
Real-World EQ Controls: Choose from legendary Neve frequency points—these are fixed-range controls chosen for their musicality.
-
Phase Button: Instantly flip phase (great for multi-mic drum setups).
-
EQ Engage: Quickly toggle EQ in and out.
-
Output Fader & Trim: Set your gain; when in Mic mode, output auto-matches as you drive the preamp.
There are a handful of helpful plugin-only features, too:
-
Resize: Fit the plugin to your screen.
-
Presets from Bob Clearmountain: Start with Bob’s settings, then tweak as needed.
-
Oversampling: For that cleaner, more hi-fi sound.
-
Value Display: See exactly how much you’re cutting, boosting, or dialing up your preamp.
EQ Section
One of the hallmarks of any Neve strip is its equalizer—and the 8068 is all about musical results from a handful of knobs. Here’s how it works:
-
High Shelf: Set at 10kHz or 12kHz, perfect for silky cymbals and vocals.
-
Mid Band: Sweepable from 350Hz up to 7.2kHz. High-Q switch for focused cuts or boosts.
-
Low Shelf: Options from 35Hz to 220Hz—great for thickening up kicks or bass.
-
Low Cut & High Cut: Clean up your lows, tame your highs—classic Neve filters.
Why these fixed frequency points? Simple. Legendary engineers chose them because they just work and give you “that sound” faster.
Additional Features
-
A/B Comparison: Instantly check your settings before/after.
-
User Presets: Save your go-to drum or vocal chain.
-
No Built-In Compressor: The pure Neve channel, which as we’ll see, still imparts a bit of natural compression just by running through the preamp!
Mixing Drums: Building the Foundation
Alright, enough talk—time to make music! For this session, we’re using raw drum tracks from James D. Cooler’s “ATM.” (Links below—go check out his music!) No processing, just raw truth. Faders at zero, a quick balance, and then… all analog emulation magic starts.
Setting Up the Raw Drum Tracks
Let’s listen to the untouched drum stems:
“Wonderfully recorded track, which always helps when we’re trying to get stuff to sound good in a mix. If you’re starting with clean, roomy drums, the Neve 8068 plugin is going to shine.”
The session is broken down as follows:
-
Kick (In and Sub)
-
Snare (Top and Bottom)
-
Overheads (L/R)
-
Hi-Hats
-
Toms (Multiple)
-
Room Mics (L/R)
You can follow along by demoing the 8068 plugin yourself—or use your favorite Neve-style channel for similar results.
Kick Drum Processing
Kick In
We start with the kick “in” mic. The goal? Punch and clarity.
-
Add Beef: Let’s dial in a touch of 60Hz for “weight” without getting muddy.
-
Tame Boxiness: Pull out some 700Hz—that nasal, cardboardy sound goes away, letting the punch shine.
-
Add Top: A gentle boost at 10kHz adds just a hint of definition.
Settings snapshot:
-
Low: +2 at 60Hz
-
Mid: -4 at 700Hz
-
High: +2 at 10kHz
Once EQ’d:
“Took a little out at 700, bit at 10k, little slap… not bad, right?”
Kick Sub
On the sub mic: No need for top, focus on sub lows (around 60Hz). Blend both kick mics for that fat, modern rock sound.
Tips:
-
Don’t overdo the lows. Blend just enough for weight.
-
Skip the gate for now—focus on getting the “sound” first.
Quick check—kick drum in solo, then blended back into the full kit.
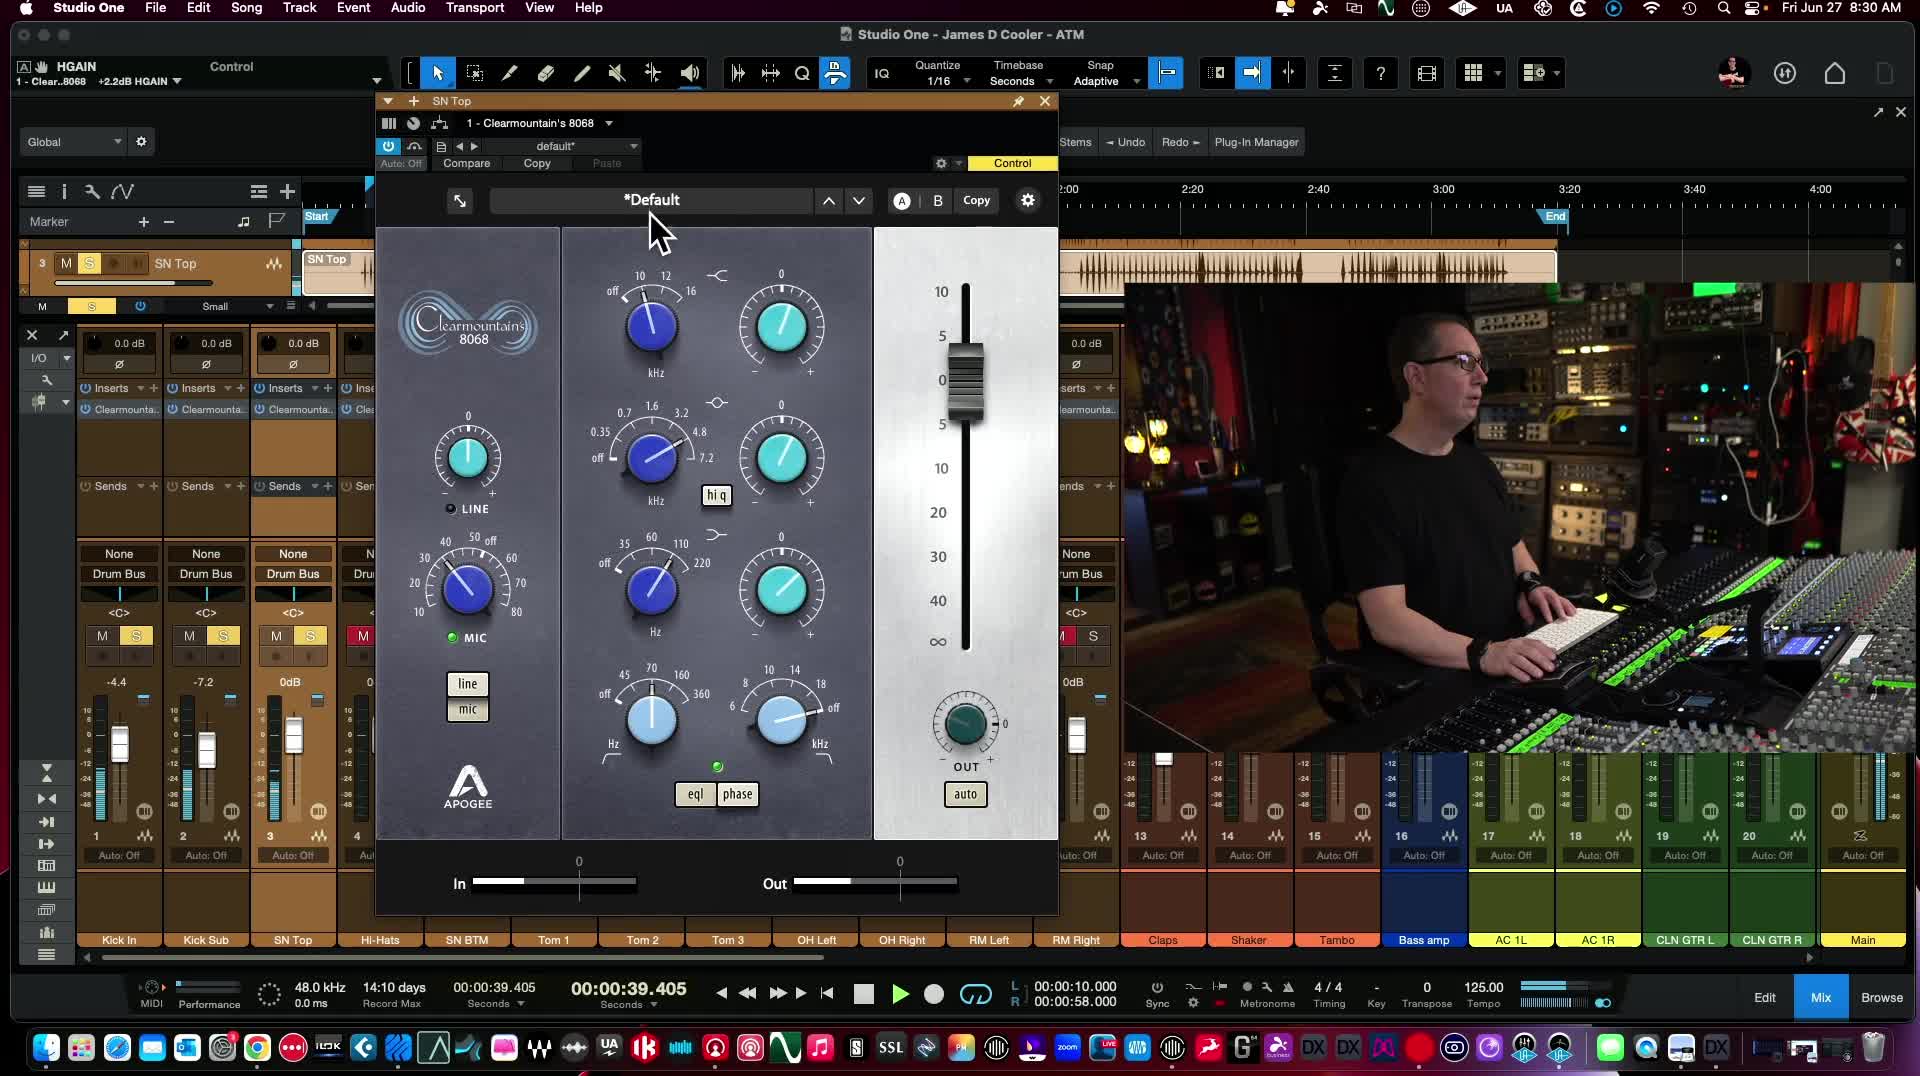
Snare Drum Details
Snare Top
We want the snare to pop but stay thick:
-
Push the Mic Pre: In mic mode, crank up the input. The plugin’s output automatically compensates, so you get more drive (and some nice saturation/compression) without blowing up your level meters.
-
EQ Moves: Try a bump at 100Hz (for body) and a shine at 7kHz–10kHz.
“Gets a little compression, little bit of saturation—that’s kind of cool.”
Neve top end lets you add presence without harshness:
“You can really push it and it’s got that nice thickness on the bottom… Never sounds brittle.”
Snare Bottom
Snare bottom mic gives you extra snap and sizzle:
-
Boost high-mids for snare wire crack.
-
Push preamp for crunch.
Solo both snare mics, adjust levels, and blend back into the main drums.
Overheads and Hi-Hats
Overheads (L/R)
These bring the whole kit together—cymbals, toms, a sense of space. Here’s how I’d approach them:
-
Tame Boxiness: Pull midrange if things sound “honky.”
-
Boost Air: Add 10-12kHz for shimmer and clarity.
-
Low Cut: Clear out unnecessary low-end rumble.
“Feel like I want to hit a little bit more beef on this thing…”
Blend both overheads, making sure they work with your snare and kick.
Hi-Hats
Solo the hi-hats and listen for any harsh frequencies. Usually, just a nibble of high boost and maybe a low cut will sit them perfectly.
“Just blend that in a little bit, don't need to do much here.”
Remember, on a Neve-style plugin, less is often more.
Toms and Room Mics
Toms
Toms usually only pop in on fills, but you still want them to sound thick and clear when they do. Here’s the move:
-
Low Cut up to ~110Hz (to clean up low-end rumble).
-
Boost at 110Hz (for resonance/fatness).
-
Optionally, push the mic pre for extra punch and a touch of drive.
“He only hits the toms a few times, but let's make them sound good when they happen!”
Blend the toms into the full kit. Listen during fills to ensure they jump out just right.
Room Mics
This is where the vibe lives! Crank the preamp a bit, EQ for energy:
-
Low Cut at 70Hz (remove boom)
-
Boost at 110Hz (adds punch)
-
Scoop mids if boxy
-
Pan L/R for width
“You can actually hear a little bit of compression when you push the preamp, even though there’s no built-in compressor.”
Blend the room mics in until the kit feels glued and energetic.
The Power of the Neve Sound
Glue and Cohesion in a Modern Mix
So, what’s the real magic of running every drum track through the 8068?
-
Everything shares the same “sonic fingerprint.”
-
The kit sounds like one cohesive unit, not separate mics stitched together.
-
You get subtle, tasty saturation and a touch of compression just by increasing the preamp.
“When you run everything through the same emulated analog gear, it has a sound before you even start. That’s what glues it all together.”
How Analog Emulation Changes Your Workflow
Mixing “in the box” can tempt you to throw hundreds of plugins at a session. With a good channel strip on every track:
-
You mix faster, make fewer second guesses.
-
Most corrective moves are simple EQ, a little drive, and level adjust.
-
Your mixes become more consistent—track after track, artist after artist.
And the best part? With the Apogee 8068 (or any great emulation), you feel like you’re working inside a real, classic studio desk. Inspiring stuff!
Wrap Up & What’s Next in the Series
After dialing in the drums with the Bob Clearmountain 8068 Neve channel strip, here’s what we have:
-
The drum kit sounds unified and pro right off the bat.
-
Each piece (kick, snare, toms, hats, rooms) feels well placed but also “part of the whole.”
-
There’s attitude, glue, and that subtle analog punch Neve is famous for.
“It gives it a nice sense of cohesion—a little bit of saturation, a little bit of compression. Just sounds a little beefier, more aggressive… That’s what Neve does!”
Coming up in this series:
-
Percussion, Bass, and Acoustic Guitars: Next week, we take the same workflow and apply it to rhythm instruments.
-
Electric Guitars and Vocals: In future episodes, we’ll keep pushing the analog vibe, top to bottom.
-
Expanding the Analog Studio: Want even more glue? We’ll start layering in tape machine and saturation plugins, plus Pultecs, 1176s, and more in a “virtual rack” approach.
Have requests for what you want to see or hear? Drop them in the comments—let’s make this an interactive journey!
Free Resources and Special Offers
If you’ve made it this far, thanks for hanging out! I want you to get hands-on:
-
Free Mixing Course: Head to HomeRecordingMadeEasy.com and grab my $100 mixing course right on the homepage—no strings attached. It’s my way of saying thanks for joining in.
-
In-Depth Analog Plugins Course: Ready to go deep with the analog mixing workflow? Check out Mixing With Analog Style Plugins Made Easy (brand new for 2025). Use coupon code
YOUTUBE25for 25% off. All the details and links are in the description box below.
Final Thoughts, Community, and Links
Mixing with channel strips like the Apogee Bob Clearmountain 8068 Neve is honestly a game-changer. You get classic punch, speed, simplicity, and most importantly—a musical workflow that just sounds right.
“Trust me, be the best money you’ve ever spent. You’ll be mixing faster, with way less plugins, and your mixes will sound way more consistent from project to project.”
Links & Resources:
-
Learn More About James D. Cooler — Artist whose song “ATM” we’re mixing in this series.
Want to see a specific instrument or challenge covered in this series? Leave a comment below, or hit me up on social media. Your feedback drives this show!
Join the Drum Mix Revolution!
If upgrading your in-the-box drum sound is on your to-do list, there’s no better time than now. Try the 8068, follow along, and most important—experiment! See what happens when you simplify your mix process and anchor your sound in classic Neve tone.
Thanks for reading (and watching)—we’re in this analog-style mixing journey together.
See you in the next episode, where we tackle percussion, bass, and acoustic guitars!
Comments? Questions? Drop them below, and don’t forget to Like, Share, and Subscribe for more detailed mixing walkthroughs. Happy mixing, friends!
“All the plugins I’m using in this series are things I use and love—no endorsements, just honest opinions from the mix trenches!”
HomeRecordingMadeEasy.com – Level up your mix. Make music fun again.

